OpenNebula Sandbox: VMware-based OpenNebula Cloud
 The VMware Sandbox appliance has been taken down for maintenance. It will be updated and back in a few days. Meanwhile, you can install OpenNebula and configure VMware using the documentation.
Do you want to build a VMware-based OpenNebula cloud for testing, developing or integration under 20 minutes?
Overview
What's this for?
OpenNebula Sandbox is a series of appliances plus quick guides to help you to quickly get an OpenNebula cloud up and running. This is useful when setting up pilot clouds, to quickly test new features. It is therefore intended for testers, early adopters, developers and also integrators.
This particular Sandbox is oriented to VMware based infrastructures administrators willing to try out OpenNebula.
What do I need to do?
There are several steps to be followed carefully in order to get the Sandbox appliance acting as an OpenNebula front-end:
- Launch the Sandbox appliance in an existing ESX host. You will have to download the appliance, load to the ESX host and boot it up. More information in the "How do I get the appliance running?" section.
- Configure the infrastructure: this is twofold, you will need to be able to use a compatible infrastructure (see "Infrastructure Requirements"), as well as correctly configure the ESX hypervisor to be used as the virtualization node (see "Hypervisor Configuration". This can be the same ESX as the one used to load the appliance, although it is assumed throughout this guide that two ESX are available.
- Configure the Sandbox Appliance: We've tried to keep this to a minimum, but you will need to enter the credentials for the ESX to be used as the virtualization node, as well as add the ESX you plan to use as the virtualization node to the OpenNebula cloud. See "Appliance configuration".
- And now the Sandbox is ready to be used! Learn how in "Using the appliance through Sunstone"
- Want to know more? Learn "What's inside the appliance" and "What comes preconfigured in OpenNebula".
What are the Users and the Passwords?
All the passwords of the accounts involved are “opennebula”. This includes:
- the linux accounts of the CentOS in the appliance, both
rootandoneadmin - the OpenNebula users, both
oneadminandoneuser
How do I get the appliance running?
In this first step is to get the appliance, place it in a ESX server and power it on.
The appliance can be downloaded from the OpenNebula Marketplace, and needs to be unziped, which will inflate a folder containing all the needed files for the appliance. You will need to place it in a location accesible for the ESX through a datastore. The appliance comes with a .vmx file with the description of the VM containing the OpenNebula front-end. You will need to use the VI client (the executable file can be downloaded from any ESX web page, just browse to its IP address) from VMware to deploy this VM in your ESX hypervisor.
The appliance (and by this, we mean the whole folder) needs to be uploaded to a datastore accesible by the ESX host. Once the appliance has been uploaded, browse the datastore where you placed the appliance and register the .vmx file (right click on the file, Add To Inventory). If the ESX asks whether you moved or copied the VM, chose that you moved it.
The appliance is configured to get an IP through DHCP, but feel free to edit the Appliance and change the network or any other setting.
Once the VM has booted up using the Power on (the play button) of the VI client, use the Console tab on the VI client to log in. Please use the “oneadmin” username and “opennebula” password! Possible tests to find out that everything is OK
- issue a
ifconfig eth0to find out the IP given by the DHCP Server. - do a
onetemplate listto ensure that OpenNebula is up and running. - issue a
sudo exportfsto find out if the NFS server is correctly configured (it should display two exports)
Infrastructure Requirements
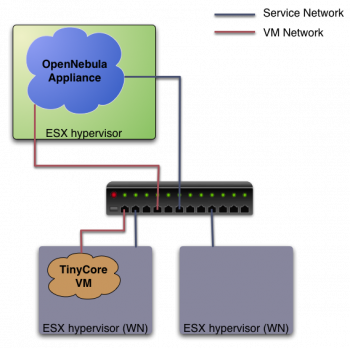
The infrastructure needs to be set up in a similar fashion as depicted in the figure.

In this guide it is assumed that at least two ESX hypervisors are available, one to host the front-end and one to be used as a worker node (this is the one you need to configure in the following section). There is no reason why just one ESX can't be used to set up a pilot cloud (use the same ESX to host the OpenNebula front-end, and also to be used as worker node), although this guide assumes two for clarity sake.
Hypervisor Configuration

This is probably the step that involves more work to get the pilot cloud up and running, but it is crucial to ensure its correct functioning. The appliance needs to be running prior to this. The ESX that are going to be used as worker node needs the following steps:
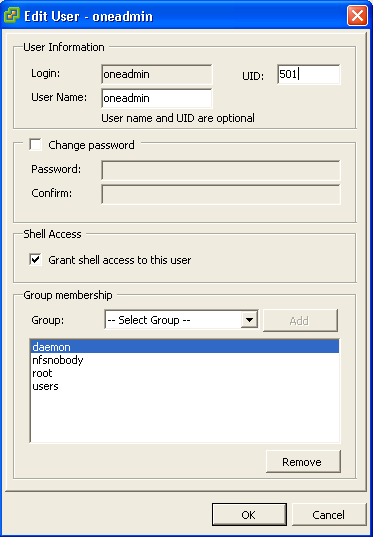
1) Creation of a oneadmin user. This will be used by OpenNebula to perform the VM related operations. In the VI client connected to the ESX host desired to be used as worker node, go to the “local Users & Groups” and add a new user like shown in the figure (the UID is important, it needs to match the one of the Sandbox. Set it to 501!). Make sure that you are selecting the “Grant shell to this user” checkbox, and type “opennebula” as password. Afterwards, go to the “Permissions” tab and assign the “Administrator” Role to oneadmin (right click → Add Permission…).
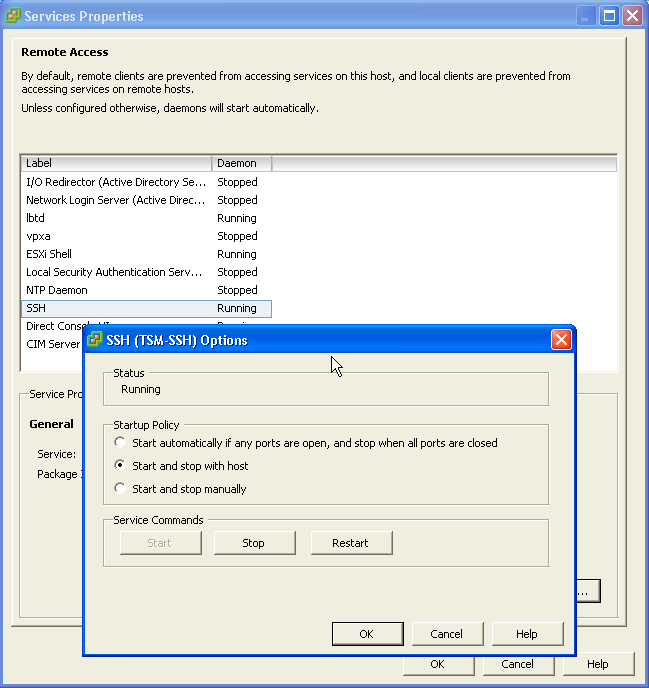
2) Grant ssh access. Again in the VI client go to Configuration → Security Profile → Services Properties (Upper right). Click on the SSH label, and then “Start”. You can set it to start and stop with the host, as seen on the picture.
Then the following needs to be done:
- Connect via ssh to the OpenNebula Sandbox appliance as user oneadmin. Copy the output of the following command to the clipboard:
<xterm> $ cat .ssh/id_rsa.pub </xterm>
- Connect via ssh to the ESX worker node (as root). Run the following:
<xterm> # mkdir /etc/ssh/keys-oneadmin # chmod 755 /etc/ssh/keys-oneadmin # vi /etc/ssh/keys-oneadmin/authorized_keys <paste here the contents of the clipboard and exit vi> # chown oneadmin /etc/ssh/keys-oneadmin/authorized_keys # chmod 600 /etc/ssh/keys-oneadmin/authorized_keys </xterm>
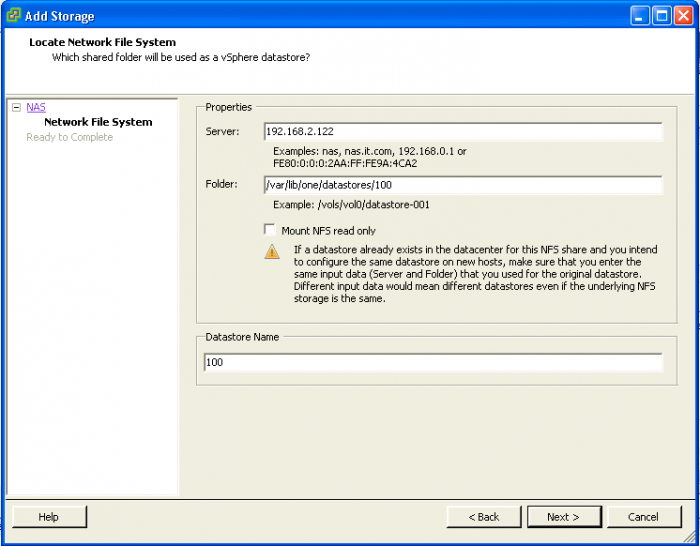
3) Mount datastores. We need now to mount the two datastores exported by default by the appliance. Again in the VI client, go to Configuration → Storage → Add Storage (Upper right). We need to add two datastores (0 and 100). The picture shows the details for the datastore 100, to add the 0 simply change the reference from 100 to 0 in the Folder and Datastore Name textboxes.
Please note that the IP of the server displayed may not correspond with your value, which has to be the IP given by your DHCP server to the appliance (you can find out with a “sudo ifconfig eth0”).
The paths to be used as input:
<xterm> /var/lib/one/datastores/0 </xterm> <xterm> /var/lib/one/datastores/100 </xterm>
More info on datastores and different possible configurations.
Appliance Configuration (minimal)
The appliance ships with an OpenNebula configured as much as possible. You will need only a couple of extra steps:
- (to be done logged in as root in the appliance) Add the ESX credentials in
/etc/one/vmwarerc. Edit the file and set the following
<xterm> :username: “oneadmin” :password: “opennebula” </xterm>

- (to be done logged in as oneadmin in the appliance) Add the ESX to be used as worker node to the OpenNebula cloud. Remember that the ESX worker node needs to be accesible from the running Sandbox appliance:
<xterm> $ onehost create <esx-hostname> -v vmm_vmware -i im_vmware -n dummy </xterm>
Using the appliance through Sunstone (or how do I use this)
Ok, so now that everything is in place, let's start using your brand new OpenNebula cloud! Use your browser to access Sunstone. The URL would be http://@IP-of-the-appliance@:9869
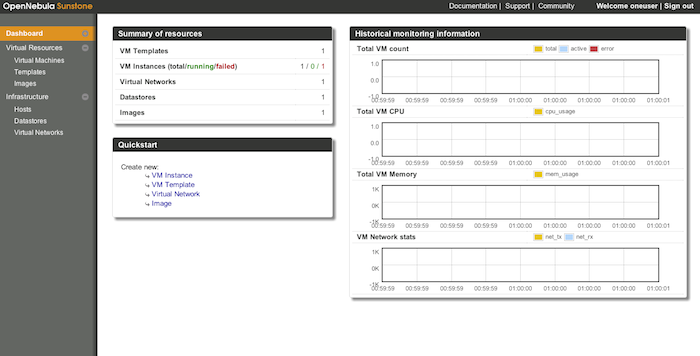
Once you introduce the credentials for the “oneuser” user (remember, “opennebula” is the password) you will get to see the Sunstone dashboard. You can also log in as “oneadmin”, you will notice the access to more functionality (basically, the administration and physical infrastructure management tasks)
You will be able to see the pre-created resources. Check out the image in the “Virtual Resources/Images” tab, the template in “Virtual Resources/Templates” one and the virtual network in “Infrastructure/Virtual Networks”.
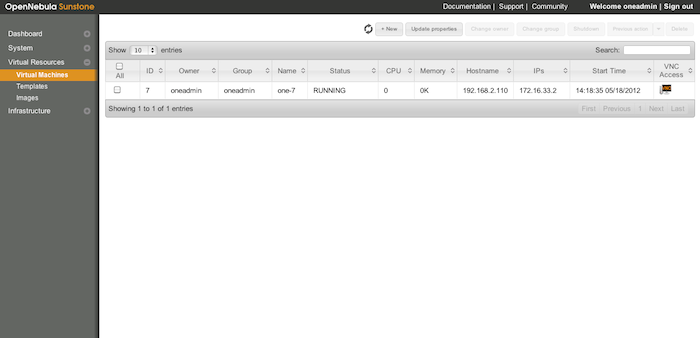
It is time to launch our first VM. This is a TinyCore based VM, that can be launched through the template. Please select the “SB-VM-Template” Template and click on the upper “Instantiate” button. If everything goes well, you should see the following in the “Virtual Resources/Virtual Machines” tab:
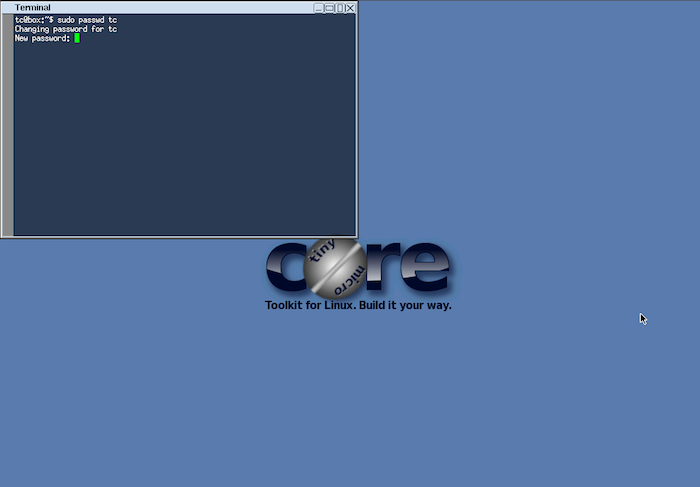
Once the VM is in state RUNNING you can click on the VNC icon and you should see the TinyCore desktop
Let's also try and access through ssh. Open a terminal in the TinyCore desktop and type:
<xterm>
$ sudo passwd tc
<set the password> </xterm>
The TinyCore VM is already contextualized. If you click on the row representing the VM in sunstone, you can get the IP address assigned. Now, from a ssh session in the CentOS appliance (or any machine connected to the ESX worker node and in the 172.16.33.x network, which is the range given by the virtual network pre defined in the OpenNebula that comes inside the appliance) you can get ssh access to the TinyCore VM:
<xterm>
$ ssh tc@<TinyCore-VM-IP>
</xterm>
Appendix
What's inside the appliance?
The appliance that complements this guide is a VMware ESX compatible Virtual Machine disk, which comes with a CentOS 6.2 minimal distribution with OpenNebula 3.8.1 pre-installed. The VM is called “OpenNebula 3.8.1 Front-End Centos 6.2” within the ESX hypervisor, and ships with a hostname (if not changed by DHCP server) of “ONE381”.
- All the dependencies needed for the correct functioning of OpenNebula have been installed. This includes the runtime dependencies for all the OpenNebula components, as well as the building dependencies (since OpenNebula has been installed from the source code).
- The appliance relies on one network interface (eth0) which is configured via DHCP (if you don't have or don't want to use a DHCP server, you can set the IP manually once the VM has booted).
- This interface eth0 is used to interface the ESX hosts, in a network we dub
“Service Network”(see the figure of the following section). - This same network interface has an alias (eth0:1) which is meant for communication with the VMs deployed by OpenNebula (the
“VM network”), with a fixed IP (172.16.33.1). We used a non common private network address to avoid collisions, but feel free to change this at your convenience.
- A NFS server comes preconfigured in the appliance to help a quick bootstrap of the storage system. A TinyCore image is already present to aid in the quickly deployment of a VM. The ESX hypervisors that are going to be used as worker nodes need to mount this pre-configured NFS export. More info on the storage model here.
What comes preconfigured in OpenNebula?
OpenNebula has been configured specifically to deal with ESX servers. The following has been created to achieve a glimpse of a running OpenNebula cloud in the minimum time possible: es
- VMware datastores (
VMwareDS), a datastore that knows how to handle the vmdk format. More info here. - TinyCore image (
TinyCore-TestImage) registered in the VMware datastore. More info here. - Virtual Network (
SBvNet) configured for dynamic networking node with VMware. More info on virtual networking. - VM Template using the TinyCore image and a lease from the Virtual Network,
ready to be launched!. More info on templates. - A regular user “oneuser” with access to the above pre-created resources.

